
By Flex
We say it all the time: Bodybuilding is about how big and awesome you look, not how much weight you can lift. Bodybuilders strive for complete development of the muscles and the overall balance and flow of the physique. Toward that end, we discourage "ego-lifting" and being concerned about the number of plates on the bar.
Instead, it's all about concentrating on making the muscles work through the full range of motion. After all, weights are simply tools to help sculpt the perfect physique. So why are we giving you a program tailored for guys who just want to lift heavy-ass weights? Simple. Central to continuing on the path to greater growth is progressive overload.
This can take many forms, including advanced techniques like supersets, giant sets, as well as increased volume, decreased rest periods between sets, training frequency, high-intensity training with forced reps, negative reps, and other methods. But the most fundamental form of progressive resistance is increasing the amount of weight used on exercises. The more you train a muscle, the stronger it will get.
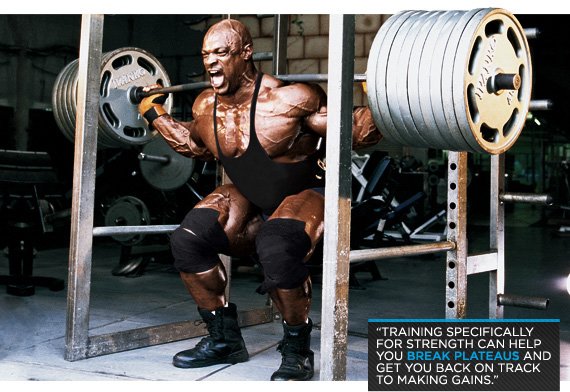
And a stronger muscle is a bigger muscle and vice versa. But eventually you will reach a point where you are using weights that are close to your maximum and strength gains will stagnate and even (gasp!) go backward. This is when training specifically for strength can help you breakplateaus and get you back on track to making gains.
The best part—in addition to boosting your numbers and consequently, beefing up your answer to the age-old question of how much do you bench?—is that when you return to traditional bodybuilding training, you will be significantly stronger and able to use more weight. This means greater overload on the muscles, forcing them to grow bigger to keep pace with your newfound strength.
A Strong Suggestion
 JUST LIFT IT.
For the next eight weeks, you will forget about bodybuilding techniques, such as the "contraction" or "feeling the muscles working through the full range of motion." Instead, your training will consist of one objective: moving the bar from point A to point B-period! Research shows that when subjects focus on moving the weight and NOT on the muscle contraction, they are significantly stronger.
STICK WITH IT.
After warming up, you will do four sets for each muscle group. For the best strength gains, keep the weight the same on all four sets.
After warming up, you will do four sets for each muscle group. For the best strength gains, keep the weight the same on all four sets.
BE A FAILURE.
Train to failure on the last set. You should be close to muscle failure on the first three sets but not complete failure so that you have enough energy for the last set.
Train to failure on the last set. You should be close to muscle failure on the first three sets but not complete failure so that you have enough energy for the last set.
HIT THE PAUSE BUTTON.
After reaching muscle failure on the last set of each exercise, do a rest-pause set by racking the bar and resting for just 15-20 seconds. Then continue the exercise, getting as many reps as possible until hitting failure again.
After reaching muscle failure on the last set of each exercise, do a rest-pause set by racking the bar and resting for just 15-20 seconds. Then continue the exercise, getting as many reps as possible until hitting failure again.
REST MORE.
You aren't trying to burn calories or fatigue the muscles. To make sure that your strength levels are fully recovered, rest three minutes or more between sets. This will allow you to stay within the prescribed rep range with the same weight on all four sets.
You aren't trying to burn calories or fatigue the muscles. To make sure that your strength levels are fully recovered, rest three minutes or more between sets. This will allow you to stay within the prescribed rep range with the same weight on all four sets.
CYCLE IT.
As we've said, rep ranges will change each week in a linear fashion. This is known as a microcycle. Each week the weight will get heavier and the reps will decrease.
As we've said, rep ranges will change each week in a linear fashion. This is known as a microcycle. Each week the weight will get heavier and the reps will decrease.
JUST A PHASE.
There are two four-week phases of this program. In Phase 1 reps start at 13-15 per set in Week 1 and progress down to 4-6 per set in Week 4. In Phase 2 reps climb back up, but they start off in Week 5 of the program at 10-12 reps per set (same as in Week 2 of Phase 1) and progressively drop down to just 2-3 reps per set in Week 8 to get you ready to test your 1-rep max again in the week that follows.
There are two four-week phases of this program. In Phase 1 reps start at 13-15 per set in Week 1 and progress down to 4-6 per set in Week 4. In Phase 2 reps climb back up, but they start off in Week 5 of the program at 10-12 reps per set (same as in Week 2 of Phase 1) and progressively drop down to just 2-3 reps per set in Week 8 to get you ready to test your 1-rep max again in the week that follows.
After completing the program, wind down with a week of light, pump-style workouts before resuming normal bodybuilding training. Warning: When you return to your bodybuilding routine, don't be alarmed when the weights feel light!
In the following paragraphs, you'll find tips (power points) that go with the workouts. But a specific tip that pops up in the last week of the program does not mean it should be saved for that period only. All these pointers apply for the duration of the program, so read the whole thing before going to the gym and making people stare in awe at your superhuman feats of strength.
Power Defined ///
Power is the rate at which energy is transferred or used. In the gym, this translates to the ability to use strength in a fast, explosive manner. If you've ever seen world-class powerlifters in action, you know that the concentric portion of the lift (the positive phase) is performed as quickly as possible.
The bar is lowered slowly and pushed up with tremendous force. This is power. All of your lifts will be performed in this manner.
Periodization ///
Getting stronger is not a matter of loading up the bar with your 1RM every workout. In fact, consistently training at or near your limit is a sure way to stall out altogether. Getting stronger is a step-by-step process that is built up gradually, in increments, over time. The best method for doing this is through periodization, or cycle training, where weights and reps change over a set time period.
Periodization elicits general adaptation syndrome, which is the body's reaction to stress. Here's how it works: New stress (training) sets off an alarm reaction in the muscle, causing it to actually get weaker. But consistent exposure to that stress will eventually lead to increased strength, which is the body's method of adapting to the stress being placed upon it.
This state is not indefinite and lasts only for a few months at best until the body "peaks," at which point gains will diminish. Athletes in powerlifting, Olympic weightlifting, track and field, bodybuilding and other sports cycle their training so that they peak for a specific meet or contest. There are three major periodization schemes:
- Linear periodization, where weights increase while reps decrease.
- Reverse linear periodization, where weights decrease while reps increase.
- Undulating periodization, where weights and reps increase and decrease sporadically.
Studies have proven that all three methods are the best way to make continuous gains and avoid the dreaded "wall" that stops progress. This program will utilize linear periodization, which research proves to be superior in producing strength gains.
The Max Factor
Even though this is an 8-week plan, it will actually take you 10 weeks to complete when you factor in 1RM testing the week before starting and the week after completing this program. Also, you won't be estimating your 1RM with a 5-rep or 10-rep max.
After all, in the final week of the program, you'll be down to two reps per set anyway. So suck it up and find your true 1RM on all three lifts, as it's the best way to accurately calculate your 80 percent, 85 percent, and 95 percent rep maxes during the program. Have spotters handy!
- Take the weight you can normally lift for 10 reps to failure, multiply it by 1.33, and round up. For example, if you can bench 225 pounds for 10 reps, start your 1RM attempt with 300 pounds.
- Allow plenty of rest between 1RM attempts. Whether or not your first lift was successful, rest 3-4 minutes between attempts.
- If you were successful on the first try but know you can do more, add another 10-20 pounds for your next attempt. Keep adding 10-20 pounds until you reach a weight at which you fail. Use the last weight you were successful at as your 1RM.
- If you weren't successful on your first attempt, don't be discouraged. Simply decrease the weight by 5-10 pounds and try again. Once you reach a weight that you can do for one rep, use that as your 1RM.
- For the most accurate results, don't do a 1RM test for the bench press, squat, and deadlift all in the same workout. Spread them out over a week so that each lift gets its own 1RM testing session.
The Super Squat Checklist
- The bar should rest near your midtraps and rear delts (rather than your upper traps). This will make it easier to balance the weight throughout the exercise.
- Grasping the bar with your thumbs wrapped around the bar, bring you hands as close to your shoulders as possible and press the bar against your back. Squeezing your shoulder blades together and pulling your elbows forward will help you support the bar.
- Keep your head aligned with your spine by fixing your gaze on an object at eye level. This will help maintain balance.
- Maintain the arch in your lower back and push your chest up and out. Contract your spinal erector muscles and abdominals to keep your core tight.
- Place your feet just beyond shoulder width; this positioning may vary slightly depending on your flexibility and comfort.

- Keep a slight bend in your knees and contract your quads, hamstrings, and glutes. Take a deep breath and hold it as you begin your descent. This will support the spine by increasing pressure inside the abdominal and chest cavities.
- Stick your glutes out as if sitting down in a chair. Descend until your upper legs are parallel to the floor.
- Begin the ascent by driving through your heels. Imagine pushing the floor away as you thrust upward with your legs.
- Concentrate on moving your hips before extending your knees. Keep your hips under the bar as much as possible to avoid leaning forward. This will relieve stress on your lower back.
- As you ascend, force your knees out hard and push out on the sides of your shoes. This will help keep tension in your hips for greater strength.
- Keep your heels on the floor to avoid leaning forward.
- Without lifting your chin, push your head back to help contract your traps for greater stability.
- Exhale as you pass the most difficult phase of the squat.
The Big Bench Checklist
- Lie on a flat bench with your feet flat on the ground, beyond shoulder width and legs bent at about a 90-degree angle. The bar should not be in your sightline when it is racked. If it is, you risk bumping the rack with the bar when pressing the weight up.
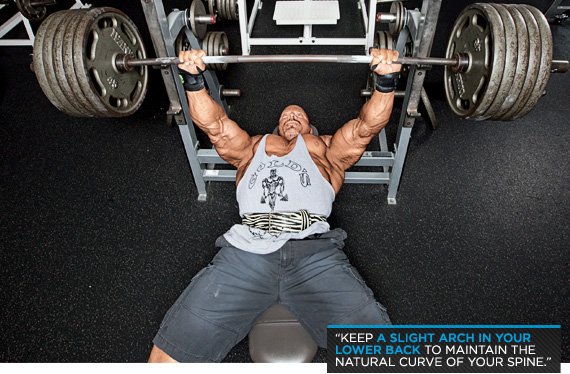
- Keep a slight arch in your lower back to maintain the natural curve of your spine.
- Keep your glutes tightly contracted; press your shoulders and glutes into the bench.
- Grip the bar slightly beyond shoulder width.
- Wrap your thumbs around the bar to prevent your wrists from flexing too much, which could decrease both force production traveling through your forearms and your overall bench-press strength. Squeeze the bar as hard as possible to transfer force from your chest, shoulder and triceps to the bar.
- Your starting position: Lift the bar off the rack so it's over your upper chest. Squeeze your scapulae together while lowering the bar. This will help stabilize your shoulder girdle and recruit your lats to help push up the weight.
- In order to increase the pressure in your chest and abdominal cavity, take a big breath and hold it as you lower the weight.
- Lower the bar slowly—a count of two seconds down will suffice—to nipple level or lower.
- Make sure that your arms form an L in the bottom position when the bar reaches your chest.
- Dig your shoulders into the bench and heels into the floor before pushing the weight up. (Imagine pushing the floor away from you with your feet.) Drive with your legs as you push the bar to transfer more force to your upper body. Keep your butt on the bench.
- Press the bar as straight up as possible, trying to "rip the bar apart" by pulling your arms outward without changing your grip. Your upper arms should form a 45- to 60-degree angle to your torso as you lower the weight and press it up.
- Exhale after passing the most difficult stage of the lift or after you reach the top position.
Raise The Dead Checklist
- Stand over the barbell so that your shins are touching the bar.
- Your feet should be about shoulder-width apart or less.
- Your toes should point straight forward or slightly out (25 degrees at most).
- Squat down to a position that is similar to the bottom position of a squat. However, the thighs will be slightly higher than parallel. Most of your weight should be on your heels to maximize the contribution of the hams and glutes.
- Always use a staggered, or mixed, grip—one hand using an underhand grip and the other using an overhand grip—for maximal strength and minimal slippage.
- Your arms should hang straight down and just outside of your thighs.
- Your upper body should lean slightly forward at about a 45-degree angle to the floor.
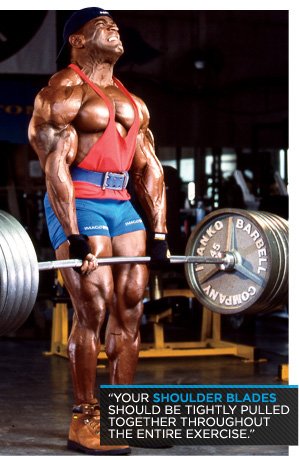
- Your shoulder blades should be tightly pulled together throughout the entire exercise.
- Maintain the natural arch in your lower back.
- Isometrically contract your entire body and exert a small measure of upward force on the bar before pulling it from the floor.
- Keep your abs pulled in tightly and contracted throughout the lift.
- The head should remain in a straight line with the back. To do this, pick a point on the floor about five or six feet ahead of you and focus on that point.
- Take a deep breath in and hold it as you prepare to ascend.
- As you stand up with the weight, imagine pushing the floor away from you with your feet.
- Your hips and shoulders should ascend together. Do not let your glutes lead the movement.
- During the ascent, the bar should travel along the front of the shins and legs.
- When you reach full extension of the knees, hips, and back, you've hit the finish point.
- In the finish position, the front of your shoulders should be behind the front part of the hips.
- Exhale as you reach the top position.
- Only allow a slight "tap" of the weights to the floor before beginning your next rep.
Training Split
This is a five-day split that you can do on any of the five days of the week that fit your schedule. Just be sure to do them in the order listed regardless of the day of the week. Below is a sample schedule using a five-on, two-off scheme.
- Monday: Bench Press/Chest and Abs
- Tuesday: Shoulders and Calves
- Wednesday: Deadlift/Back, Traps, and Abs
- Thursday: Triceps, Biceps, and Forearms
- Friday: Squat/Legs and Calves
Week 1 ///
POWER POINT 1
POWER POINT 1
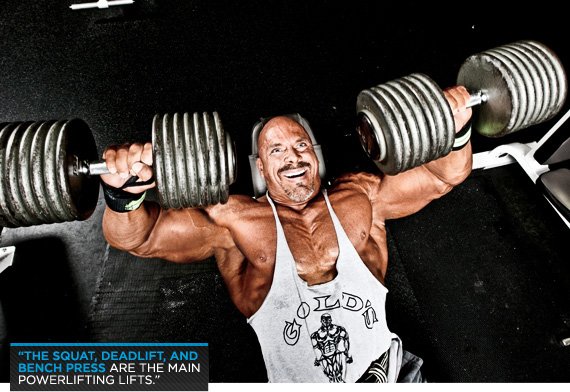
It's no accident that the squat, deadlift, and bench press, or the "big three," are the main lifts in the sport of powerlifting. There is no greater test of pure power than these three exercises, which together utilize every muscle in the body. This program will focus on increasing your one-rep maximum (1RM) on all three lifts.
In traditional bodybuilding training, the exercises are simply a means to one end—building the physique. No one has ever won a bodybuilding contest by benching or squatting more than his competitors onstage. But during this program, the exercise is the end. You are training the lift, not merely using it to build bigger and stronger muscles.
Workout 1: Bench Press/Chest and Abs


Barbell Bench Press - Medium Grip
4 sets of 13-15 reps

Barbell Incline Bench Press - Medium Grip
4 sets of 13-15 reps

Dumbbell Bench Press
4 sets of 13-15 reps

Incline Dumbbell Flyes
4 sets of 13-15 reps

Reverse Crunch
3 sets of 20-30* reps

Crunches
3 sets of 20-30* reps

Oblique Crunches
3 sets of 20-30* reps


*Shoot for at least 20-30 reps, but if you can do more, continue until reaching failure. If you cannot complete 20 reps, do as many as you can, trying to get as close to 20 reps as possible.
Workout 2: Shoulders and Calves


Barbell Shoulder Press
4 sets of 13-15 reps

Standing Dumbbell Upright Row
4 sets of 13-15 reps

Standing Low-Pulley Deltoid Raise
4 sets of 13-15 reps

Cable Seated Lateral Raise
4 sets of 13-15 reps

Standing Calf Raises
4 sets of 25-30 reps

Seated Calf Raise
4 sets of 25-30 reps
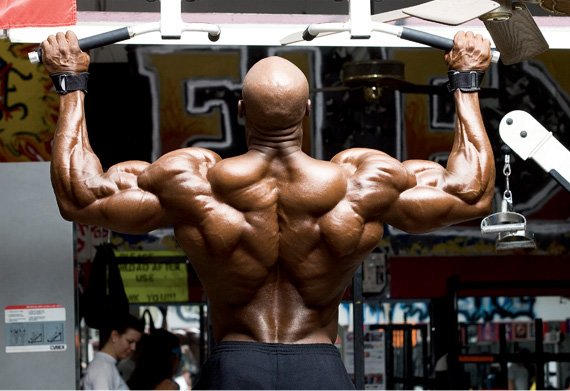
Workout 3: Deadlift/Back, Traps, and Abs


Barbell Deadlift
4 sets of 13-15 reps

Bent Over Barbell Row
4 sets of 13-15 reps

Wide-Grip Lat Pulldown
4 sets of 13-15 reps

Underhand Cable Pulldowns
4 sets of 13-15 reps

Seated Cable Rows
4 sets of 13-15 reps

Barbell Shrug
4 sets of 13-15 reps

Barbell Hip Thrust
4 sets of 13-15 reps-
Crunches
3 sets of 20-30* reps 

Plank
3 sets of 1 min
*Shoot for at least 20-30 reps, but if you can do more, continue until reaching failure. If you cannot complete 20 reps, do as many as you can, trying to get as close to 20 reps as possible.
Workout 4: Triceps, Biceps, and Forearms


Close-Grip Barbell Bench Press
4 sets of 13-15 reps

Standing Dumbbell Triceps Extension
4 sets of 13-15 reps

Triceps Pushdown
4 sets of 13-15 reps

Barbell Curl
4 sets of 13-15 reps

Standing Biceps Cable Curl (Behind the back)
4 sets of 13-15 reps

Dumbbell Bicep Curl
4 sets of 13-15 reps

Seated Palm-Up Barbell Wrist Curl
3 sets of 13-15 reps

Reverse Barbell Curl
3 sets of 13-15 reps
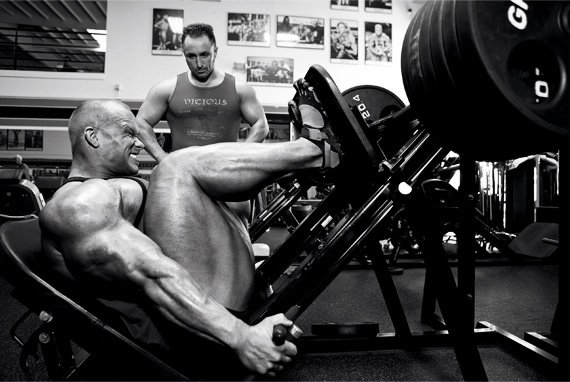
Workout 5: Squat/Legs and Calves


Barbell Squat
4 sets of 13-15 reps

Front Barbell Squat
4 sets of 13-15 reps

Leg Press
4 sets of 13-15 reps

Leg Extensions
4 sets of 13-15 reps

Lying Leg Curls
4 sets of 13-15 reps-
Seated Calf Raise
4 sets of 25-30 reps 

Calf Press On The Leg Press Machine
4 sets of 25-30 reps
Week 2 ///
POWER POINT 2
POWER POINT 2
"This year, I've been training heavier and for lower reps than I have in the past. For example, I spent a few weeks doing five-reps on basic, compound exercises. The goal was to build up my strength so that I had a stronger base to work from. The increased strength allowed me to train heavier when I returned to my normal rep range, which is around 8-12. My muscles were forced to handle heavier weights and they responded by getting bigger. The result was that I was bigger and harder at the end of this off-season."
-Phil Heath, Mr. Olympia, 2011
-Phil Heath, Mr. Olympia, 2011
Workout 1: Bench Press/Chest and Abs
-
Barbell Bench Press - Medium Grip
4 sets of 10-12 reps -
Barbell Incline Bench Press - Medium Grip
4 sets of 10-12 reps -
Dumbbell Bench Press
4 sets of 10-12 reps -
Incline Dumbbell Flyes
4 sets of 10-12 reps 

Hanging Leg Raise
3 sets of 15-19* reps

Weighted Crunches
3 sets of 15-19* reps

Dumbbell Side Bend
3 sets of 15-19* reps
* If you cannot complete 15 reps, do as many as you can, trying to get as close to 15 reps as possible.
Workout 2: Shoulders and Calves
-
Barbell Shoulder Press
4 sets of 10-12 reps -
Standing Dumbbell Upright Row
4 sets of 10-12 reps -
Standing Low-Pulley Deltoid Raise
4 sets of 10-12 reps -
Cable Seated Lateral Raise
4 sets of 10-12 reps -
Standing Calf Raises
4 sets of 15-20 reps -
Seated Calf Raise
4 sets of 15-20 reps
Workout 3: Deadlift/Back, Traps, and Abs
-
Barbell Deadlift
4 sets of 10-12 reps -
Bent Over Barbell Row
4 sets of 10-12 reps -
Wide-Grip Lat Pulldown
4 sets of 10-12 reps -
Underhand Cable Pulldowns
4 sets of 10-12 reps -
Seated Cable Rows
4 sets of 10-12 reps -
Barbell Shrug
4 sets of 10-12 reps -
Hanging Leg Raise
3 sets of 15-19* reps 

Decline Crunch
3 sets of 15-19* reps

Side Bridge
3 sets of 1 min
* If you cannot complete 15 reps, do as many as you can, trying to get as close to 15 reps as possible.
Workout 4: Triceps, Biceps, and Forearms
-
Close-Grip Barbell Bench Press
4 sets of 10-12 reps -
Standing Dumbbell Triceps Extension
4 sets of 10-12 reps -
Triceps Pushdown
4 sets of 10-12 reps -
Barbell Curl
4 sets of 10-12 reps -
Standing Biceps Cable Curl (Behind the back)
4 sets of 10-12 reps -
Dumbbell Bicep Curl
4 sets of 10-12 reps -
Seated Palm-Up Barbell Wrist Curl
3 sets of 10-12 reps -
Reverse Barbell Curl
3 sets of 10-12 reps
Workout 5: Squat/Legs and Calves
-
Barbell Squat
4 sets of 10-12 reps -
Front Barbell Squat
4 sets of 10-12 reps -
Leg Press
4 sets of 10-12 reps -
Leg Extensions
4 sets of 10-12 reps -
Lying Leg Curls
4 sets of 10-12 reps -
Seated Calf Raise
4 sets of 15-20 reps -
Calf Press On The Leg Press Machine
4 sets of 15-20 reps
Week 3 ///
POWER POINT 3
POWER POINT 3
Always have a reliable spotter (or two) on standby. Whether you're maxing out or doing triples or doubles, you do not want to stall out and have the weight come crashing down on you. In addition, research has shown that those lifting in groups used more weight than those who trained by themselves.
Workout 1: Bench Press/Chest and Abs
-
Barbell Bench Press - Medium Grip
4 sets of 7-9 reps -
Barbell Incline Bench Press - Medium Grip
4 sets of 7-9 reps -
Dumbbell Bench Press
4 sets of 7-9 reps -
Incline Dumbbell Flyes
4 sets of 7-9 reps -
Barbell Hip Thrust*
3 sets of 10-14 reps 

Cable Crunch
3 sets of 10-14 reps-
Cable Oblique Crunch
3 sets of 10-14 reps
* Perform the hip thrust while holding a medicine ball or dumbbell between your feet, or while wearing ankle weights.
Workout 2: Shoulders and Calves
-
Barbell Shoulder Press
4 sets of 7-9 reps -
Standing Dumbbell Upright Row
4 sets of 7-9 reps -
Standing Low-Pulley Deltoid Raise
4 sets of 7-9 reps -
Cable Seated Lateral Raise
4 sets of 7-9 reps -
Standing Calf Raises
4 sets of 10-14 reps -
Seated Calf Raise
4 sets of 10-14 reps
Workout 3: Deadlift/Back, Traps, and Abs
-
Barbell Deadlift
4 sets of 7-9 reps -
Bent Over Barbell Row
4 sets of 7-9 reps -
Wide-Grip Lat Pulldown
4 sets of 7-9 reps -
Underhand Cable Pulldowns
4 sets of 7-9 reps -
Seated Cable Rows
4 sets of 7-9 reps -
Barbell Shrug
4 sets of 7-9 reps -
Barbell Hip Thrust*
3 sets of 10-14 reps -
Cable Crunch
3 sets of 10-14 reps 

Standing Cable Wood Chop
3 sets of 10-14 reps
Week 3 ///
POWER POINT 4
POWER POINT 4
"When I first started, my chest was really weak, but through powerlifting, I was able to bring it up to where it's now one of my best body parts. I think getting stronger is definitely the best way to pack on muscle. Let me put it this way, when was the last time you saw a really big guy who couldn't handle a decent amount of weight in any exercise? If you are struggling to get big, along with eating plenty of good food, I would definitely recommend doing some powerlifting or powerlifting-style training. The stronger you get, the bigger you'll get. The two go hand in hand."
-Branch Warren, 2011-2012, Arnold Classic winner
-Branch Warren, 2011-2012, Arnold Classic winner
Workout 4: Triceps, Biceps, and Forearms
-
Close-Grip Barbell Bench Press
4 sets of 7-9 reps -
Standing Dumbbell Triceps Extension
4 sets of 7-9 reps -
Triceps Pushdown
4 sets of 7-9 reps -
Barbell Curl
4 sets of 7-9 reps -
Standing Biceps Cable Curl (Behind the back)
4 sets of 7-9 reps -
Dumbbell Bicep Curl
4 sets of 7-9 reps -
Seated Palm-Up Barbell Wrist Curl
3 sets of 7-9 reps -
Reverse Barbell Curl
3 sets of 7-9 reps

Workout 5: Squat/Legs and Calves
-
Barbell Squat
4 sets of 7-9 reps -
Front Barbell Squat
4 sets of 7-9 reps -
Leg Press
4 sets of 7-9 reps -
Leg Extensions
4 sets of 7-9 reps -
Lying Leg Curls
4 sets of 7-9 reps -
Seated Calf Raise
4 sets of 10-14 reps -
Calf Press On The Leg Press Machine
4 sets of 10-14 reps
Week 4 ///
POWER POINT 5
POWER POINT 5
Several muscles play key roles in assisting or stabilizing the prime movers in each of the three lifts. You will perform assistance exercises to strengthen the "role-players" so that there are no weak links. Typically, you will do fewer sets and slightly higher reps for these exercises than you will in the bench press, squat, and deadlift.
Workout 1: Bench Press/Chest and Abs
-
Barbell Bench Press - Medium Grip
4 sets of 4-6 reps -
Barbell Incline Bench Press - Medium Grip
4 sets of 4-6 reps -
Dumbbell Bench Press
4 sets of 4-6 reps -
Incline Dumbbell Flyes
4 sets of 4-6 reps -
Hip Thrust (on Smith Machine)
3 sets of 7-9 reps 

Ab Crunch Machine
3 sets of 7-9 reps

Band Roundhouse Elbow*
3 sets of 7-9 reps
Workout 2: Shoulders and Calves
-
Barbell Shoulder Press
4 sets of 4-6 reps -
Standing Dumbbell Upright Row
4 sets of 4-6 reps -
Standing Low-Pulley Deltoid Raise
4 sets of 4-6 reps -
Cable Seated Lateral Raise
4 sets of 4-6 reps -
Standing Calf Raises
4 sets of 7-9 reps -
Seated Calf Raise
4 sets of 7-9 reps
Workout 3: Deadlift/Back, Traps, and Abs
-
Barbell Deadlift
4 sets of 4-6 reps -
Bent Over Barbell Row
4 sets of 4-6 reps -
Wide-Grip Lat Pulldown
4 sets of 4-6 reps -
Underhand Cable Pulldowns
4 sets of 4-6 reps -
Seated Cable Rows
4 sets of 4-6 reps -
Barbell Shrug
4 sets of 4-6 reps -
Hip Thrust (on Smith Machine)*
3 sets of 7-9 reps -
Ab Crunch Machine
3 sets of 7-9 reps -
Plank
3 sets of 75 sec
Week 4 ///
POWER POINT 6
POWER POINT 6
"One of the easiest ways to measure progress, especially for beginning athletes, is to record how much weight you are lifting. During the early years of this lifelong journey, I used that as a reflection of my training progress. Looking at pictures of my heroes in the magazines and watching the big guys in the gym, I realized that they were using what, to me at that time, seemed like an impossible amount of weight. It made me work hard to get stronger so that I could put the same number of plates on the bar or use the dumbbells that were at the far end of the rack, a place where very few people ventured. Through trial and error and always keeping an open mind, I learned that bodybuilding is more than lifting weights, but those early days of focusing on heavy weights did help lay the foundation that I would build upon through the the years."
-Kai Greene, 2009-2010 Arnold Classic winner.
-Kai Greene, 2009-2010 Arnold Classic winner.
Workout 4: Triceps, Biceps, and Forearms
-
Close-Grip Barbell Bench Press
4 sets of 4-6 reps -
Standing Dumbbell Triceps Extension
4 sets of 4-6 reps -
Triceps Pushdown
4 sets of 4-6 reps -
Barbell Curl
4 sets of 4-6 reps -
Standing Biceps Cable Curl (Behind the back)
4 sets of 4-6 reps -
Dumbbell Bicep Curl
4 sets of 4-6 reps -
Seated Palm-Up Barbell Wrist Curl
3 sets of 4-6 reps -
Reverse Barbell Curl
3 sets of 4-6 reps
Workout 5: Squats/Legs and Calves
-
Barbell Squat
4 sets of 4-6 reps -
Front Barbell Squat
4 sets of 4-6 reps -
Leg Press
4 sets of 4-6 reps -
Leg Extensions
4 sets of 4-6 reps -
Lying Leg Curls
4 sets of 4-6 reps -
Seated Calf Raise
4 sets of 7-9 reps -
Calf Press On The Leg Press Machine
4 sets of 7-9 reps
No comments:
Post a Comment